Thursday, December 20, 2012

Get Your Craft On

September? Seriously?  I'm so sorry I haven't posted since then.  I have had so many partially created posts for so long, I really have to put them on my to do list.  So Sorry again my peeps :)

Okay, so lets just jump right into December and my all favourite time of year. CHRISTMAS !!!  I think one of the reasons it is my favourite is that I find myself doing a lot of crafts, ornaments, and lots of sewing.  It seems everyone loves giving handmade items for Christmas, and I truly love helping everyone out.  I think it is so much more special to receive a handmade gift from someone (even if you didn't make it)  It makes me think that someone took the time to really think of the perfect gift. Much better than a gift card or prebought basket. Although I will TOTALLY take those off your hands as well ;)

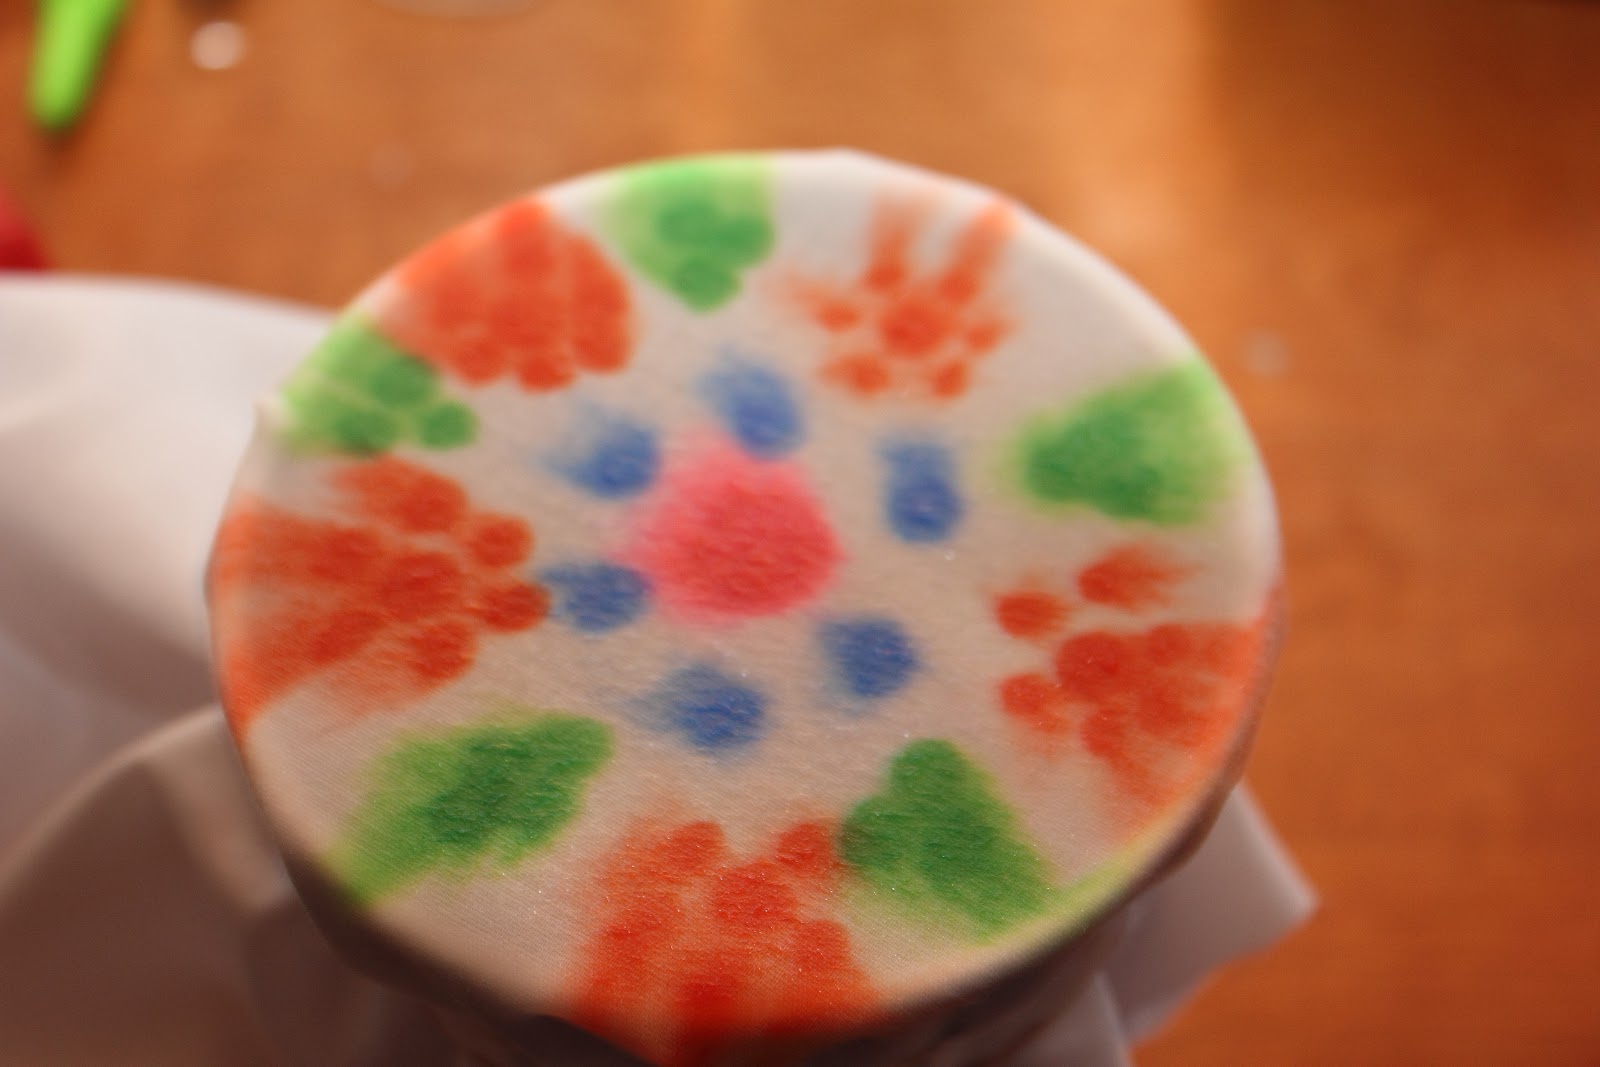
Ok, this first post is adapted from an idea I saw on Pinterest. I couldn't tell you the site as I forgot to pin it, but I will mention this was not my idea, only a recreation.

Both kids started out helping, but Spencer quickly lost focus and found something else to do.  It was pretty quick, maybe 20 minutes start to finish. Cute for the kids to make and put on the table for dinner.


Enjoy,

Happy Crafting :)

Tuesday, September 11, 2012

Topsy Tail - Heart Hairstyle

Okay, so I'm back. I know, I know, you all missed me and my crafty ways I'm sure ;)  If you know me and what's going on in my life lately, you'll understand why, and if not, give me a break would ya. lol.

I do have a bunch of posts lined up, I just need to finish up the pictures and the finished projects, but just you wait.  You'll be AMAZED at what I have in store.

This isn't entirely crafty, exactly, but it is cute and everyone always asks me how I do it.  So here goes...

I don't know how many of you are children of the 80's/90's but we had some pretty funky hair to say the least.  The tool I use for this hairstyle comes straight from that era. 


We couldn't find one so we made one ourself.  We used the end of a flyswatter we bought at the dollar store.  Clipped off the end and taped it up with some good old duct tape.

Make sure you have a pretty rounded end or you might get the odd complaint about poking your little ones head.

First thing is to put in as many ponytails as you want hearts.  The most we've done is 4, but I'm sure you can do more.

We did 2 for the tutorial (sorry about the darkness, this was after her bath just before bed time)


First, stick the taped end up under the ponytail and pull it up slightly.


Then, put the end of the ponytail through the end of the topsy tail.


Pull up on the taped end of the topsy tail.  This might take some easing into because it might tug a bit.


Let it hang and repeat for all other ponytails.

Split the ponytail into to and twist each end over your fingers a few times.  It will start to curve around your finger. 

Gather the end together and secure with a small elastic.  If it isn't quite tight enough put the end through the loop again.


Voila :)  We add ribbon and bows just to make it cuter. (as if it wasn't cute enough)


This is the creation we did for St Patricks Day.  See... the options are endless.

 Please feel free to send me pictures of your creations.

Happy Crafting.

Thursday, July 26, 2012

Sidewalk Paint

So this is probably the easiest craft yet.  It took me (with some help from Avery) about 10 minutes to measure and mix the paint.  I used mason jars with lids so we could save any unused paint, but any small container will work.

Here's what you need.
Cornstarch
Water
Food Colouring (I used wilton, but liquid would work too)
Containers

Cornstarch - I used 3tbsp.  You need 2x the amount of water, so I added 6 tbsp of water.
If you want more, try 4 tbsp cornstach, 8 tbsp water etc.


I added the cornstarch and water to the mason jars.


We chose basic colours, but should have added a black or brown because we made a bit of a mess trying to mix colours.


Here's our colours all mixed up.  The paint and water will settle a bit after time, but we didn't notice any difference while using them.


Now head outside and begin your masterpiece.  The kids LOVED this paint and we spent about 4 hours over 2 days playing with them. 

This was Spencer's ladybug. (It is wet, but will look like chalk when it's dry)
Avery and my Rainbow.  We had to be creative with colours :)

Here's how it looks dry.  So fun.

I'd love to see any sidewalk art you come up with.  Send me an email and I'll add some of my favourites to the site.

Happy Crafting
Ginny

Tuesday, July 3, 2012

Sharpie Tie Dye

Okay, so anyone who knows me, knows I'm ADDICTED to pinterest.  A new craft fad I have been researching was tie dye.  Another awesomely crafty mom and I had teamed up and thought about a way to teach this craft as a year end craft project for our kids class.  This was perfect, and it was a great way for the kids to show off their drawing skills.  We thought about shirts or aprons, but I offered my services to make each of the kids a white pillowcase to decorate as they please.
Okay, so here's what you need to get started.
You don't need everything, but markers, something white (or light coloured) and rubbing alcohol are a must.
Decide whether you want to place a cup and elastic to draw your design in a circle formation or if you want to freehand your design directly onto the fabric.  If you decide to draw freehand, make sure you have something between the 2 layers because the marker will go right through to the back. 

The kids had large pieces of cardboard in between theirs.
Here's the pillowcases the kids used to draw on.


Here's some of the magic happening :)


I did a couple to show the kids, some ideas, but most of them just wanted to draw pictures.


The next step is to use either a spray bottle with rubbing alcohol, or medicine dropper.  The spray bottle worked great on the pillowcases, and the dropper on the cups.  A couple of drops is all you need for the cups, but it is trial and error.  The more you use, the more running, and it will continue to run even after you have stopped.  I have learned from experience, that the alcohol has to be at least 70%.  Because of this reason, I had to take the pillowcases home to spray, we couldn't do it at the school.


If you wanted more spreading, you just had to tilt the cup a bit.

Each design smudged differently, but I didn't notice too much difference between the Bic markers and the Sharpie markers.  I did notice that different colours did run differently though.  Red, green, pink and purple were the most.


Here's an example of a rainbow.  Looks cute if you ask me.


Ladybug


Everyone was thrilled with their pillowcases.  I think they turned out great.  I wish I had remembered to take my camera back to school when they took them home because they looked great.

Here's my kids pillowcases that they sleep with everynight and they take with them everywhere we go. 


Super easy project for all ages, and most likely you'll have everything already at home.

Happy Crafting
Ginny

Friday, June 22, 2012

Old Crayons Made New Again.

Man, can you believe how hot it is outside?  You could literally fry an egg on the sidewalk.  Then I remembered something I had seen on Pinterest.  Crayons melted down into new shapes in ice cube trays.  Now I'm sure you're thinking, why would this crazy lady turn on her oven when it is 39 degrees outside?  Well, we didn't.  We melted these in the Van?!?  I know, crazy.  I couldn't even begin to imagine how it felt for the poor dog that was rescued at lunch time today in someone's vehicle.  What is wrong with people... they need they're head shaken.  That's a whole different story I'll get into later ;)  Sorry, the how to, right.

I'm sure if your house is anything like mine, you have tons of broken and worn down crayons. Have the kids track down as many as they can.  I think we used about 30, but it doesn't reall matter.

Next, have them peel the wraper off.  The kids started off helping really good, but grew tired of this quickly.  Some seemed like the wrapper just fell off, and others seemed like they were glued on. Weird since we used all Crayola. 

Next they broke them up into small pieces and put like colours together.

The kids decided which colours they wanted to put together into the moulds.  The moulds are silicone and I got them at Ikea for $1.49 each.

We put them onto a cookie sheet and placed them on the dashboard in the van.
After about 30 minutes they were looking quite shiny.


Some of us are more patient then others, but after 60 minutes they were done.


I popped them into the freezer for a couple of minutes to make sure they were cool enough to take out.

EDIT: If your sun decides to hide in the clouds, you can melt them in a 200 degree oven in about 15 minutes.
Voila, brand new crayons to colour with.


We are using ours as a gift to the kids at the end of the school year.

Happy Crafting

Friday, June 8, 2012

Homemade Laundry Soap

With the economy as it is these days, and our income not increasing anytime soon, I wanted to see what was costing us the most each month and try to come up with a way to make that expense less.  The big one was laundry.  I did some research and came up with a few recipes for homemade laudry soap, and finally came up with my own version of the two.  One recipe made a MASSIVE amount, and the other was a concentrated version.  My husband didn't quite understand that he only needed a tbsp of the concentrated version, and I could see this method being used up a lot quicker :) so I decided to try out the larger version.  I us a US 5 Gallon pail that we had laying around the house, but some other ideas for storage could be some old used laundry containers or even an empty water jug. 

So here's what you need to buy...


1 bar Sunlight soap (I found this at my local Metro store), Fels Naptha soap (the more popular brand in the US) or whatever soap you can find
1 1/2 cup 20 Mule Team Borax (from Walmart) Canada and the US
1 1/2 cup Washing Soda *** not baking soda*** see link below for how to make it yourself
water

The first thing I realized was that washing soda is incredibly hard to find in Canada.  If you make frequent trips to the states, then you can find it at Walmart, however I had no luck finding it here.  I learned how to make my own washing soda HERE and HERE. Both these sites have great ideas for frugal tips and green living, (always a bonus).


 I've made 2 batches of the 5 gallons since February, it lasts us about a month and a half. I know that 10 gallons might seem like a lot, but we do a couple loads of laundry every day, sometimes its the same load twice because we've forgotten about it and now it smells and we have to re-wash it ;)   I've done the math and it works out to about $11 for the ingredients, but you don't use it all.  A box of borax cost me $5 and I used maybe a 5th of the box.  The sunlight bars was a 3 pack and was $5. And the baking soda I turned into washing soda was $1.73.The 5 gallon pail makes about 150 loads.  Using 1/2 cup per load means each load only costs about 2 cents.  Seriously, I am NEVER buying laundry soap again.


So the first step is to grate the entire bar of  soap.  I let the kids help me for this. 

 I use a large pot for this next step, but a dutch oven or large stew pot would work.   Fill the pan about half way with warm water and place it on your stove over medium heat. Boil a full kettle of water, you will need it shortly. Add your grated soap, stirring until melted.

Add in 1 1/2 cups of washing soda and 1 1/2 cups of borax, stirring constantly until it is an even consistency.

Lower the heat to medium and let the soap sit and thicken.  Try not too stir too much. Keep an eye on the mixture and lower heat if needed.  YOU DO NOT WANT IT TO BOIL.  Trust me :) If it begins to boil, lower the temperature, and remove from heat.  Don't worry if this happens as the soap will still work and your stove will be VERY clean. After about 15 minutes your mixture should be about the consistency of honey and will be ready to mix with water.

Add the water that you boiled to your 5 gallon bucket first.  I forgot this step the first time, so this is why I mention it :)

Next add your soap and stir well.

Continue to add cold water, stirring regularly, until the bucket is full. Your soap might get a bit foamy from adding the water, but won't affect the soap in the long run. 

Leave the soap uncovered overnight to cure, then make sure to keep the lid on tight after that, as it will evaporate a bit if left open too long. (Just a side note, you might want to move your bucket out of the kitchen after you are done making this as your 6 year old might dump the ENTIRE PAIL onto the kitchen floor, down the hallway, and down the basement stairs) Good thing it was easy to make :)
There you have it.  I have now made 3 batches of the soap and couldn't be happier.  No one seems to notice the difference in my clothes except my wallet :)


Happy Crafting